Leaking Fuel Tanks
Date: May 10, 1998
From: Armand
After 16 years, my fuel tank developed a leak. I know that many owners of Endeavor 40 have had this problem and had their tank removed and repaired or replaced. Because of its location it means removing both engine which I recently replaced).
Rather than going to all that trouble again, I am considering changing over one of the water tanks into a diesel fuel tank and putting a flexible tank for water inside the old leaky diesel tank.
One of the problems I see is being able to clean the Aluminum water tank. Which over the 15 years has developed considerable calcium buildup on the inside. I think its calciumanyway their little white beads that stick to the aluminum sides. You can scrape them off but I'm unable to reach some portions of the tank through the inspection plate. Has anyone any knowledge of any solution that can remove these safely?
The other thing I'm considering is just removing the generator, and cutting away the fiberglass ledge, which will expose about 4 feet of the top of diesel tank. Then cutting open the exposed top of the tank and have a new aluminum tank made up to feet into this opening. (I expect this would give me a volume of about 50gals)
Has anybody got any other sugestions or any other solutions other that removing both engines and replacing the tank? If so please advise. Thanks
Date: May 18, 1998
From: George Michelson
Well I'm afraid I have bad news to impart...
First...I own an Endvr 40, for about 7 years, she's an 81 and needed work when I got her. The fuel tank problem is not uncommon for Endvr 40s. I have not personnally had the problem...but I did have a significant diesel fuel contamination problem which I fixed last year...during that process a very knowledgeable boat mechanic explained a possible malady that was one of the possibles we looked at during my fix.
As explained to me The aluminum fuel tank that is mounted centerline and forward of the engine is susceptable to water intrusion through the bilge if the fuel tank is allowed to stand in contact with the bilge water for a period of time. It seems that a combination of electrolisis and osmosis over time breaks down the welds of the fuel tank and allows the water to slowly intrude into the fuel tank. The bad news is that there is no simple fix to the problem and that it must be addressed by removing the fuel tank and coating it in fiberglass or replacement... Each fix requires the removal of the tank which is a BIG job considering it's location and access...
Good luck...I hope this isn't the problem but I hope the information helps...feel free to give me a head's up for more information...
George Michelson "WHIMSEA"
Date: May 27, 1998
From: Armand Zerilli
Nearly every Endeavour 40 owner I know has had problems with their Aluminum fuel tanks. After 15 years mine finally started to leak. This is the "Achilles Heel" of this boat which otherwise is a very well designed yacht.
As the original owner I have been very careful to keep the bilge clean. However time and the method that they employed in placing these tanks in the bilge caused the diesel tank to corrode. Endeavour placed these tanks so that they lie on the floor of the bottom of the bilge. No matter how careful you are in keeping it dry the very fact that they are not tied down and will float causes all sorts of debris to form under the tank. This debris naturally absorbs the salt-water and dampness along with the original dirt and sawdust, which forever sits under the tank, eating away the aluminum (especially at the welded seams)
I did not want to remove the Yanmar engine, which I recently put in replacing the Perkins 4-108 {which had seen its day after nearly 10,000hrs}. So I just removed the generator (Westerbeke 5kw). This was easy to do using my vang 4-1 purchase which I hung from a board above the companionway, and moved the generator out of the way on rollers into the main salon. I then cut the base platform that the generator sat on, which gave me access to approximate 80% of the top of the tank. Because the front of the tank sits up against a bulkhead and the rear is nearly flush against the back of the keel the only way to remove the tank is to lift it straight up. This would have meant removing the Yanmar as well as the shelf which holds my various pumps and a lot of other items, which I had installed over the years.
I decided to trash the tank and by using a sawzall and cut the top front (about 30inches) off, and then proceeded to cut each of the sides at the mid- point and lifted it up; causing it to fold into itself without having to cut off the bottom. By this method I was able to remove the tank from the boat with out much trouble. It took a helper and myself about 2 hours to do this.
In order to have the correct dimension for a new tank and to make sure I could get it in the cavity that I opened in the keel, I made a template out of doorskin for the new tank. It turned out to be 30-1/2" high 52"long with the front top 18"wide and its bottom 13" wide, and the back 6' wide on top and 3" wide on the bottom. In trying to get it in I found that I had to cut off a diagonal piece off the bottom back end. This caused me to lose about a gallon at most. Also I had to cut away a small portion of the front of the shelf (the well which the Yanmar sits. Over all I'm ending up with a tank that will hold about 68 gallons. I'm having it made out of aluminum again but this time I'm sitting it on a group of inch ID PVC piping so that it will not normally come in contact with bilge water.
The new tank I'm having fabricated by a local welding shop will cost me $500.00. Because I now have about 8" room in the rear of the keel (the old tank was 60" long ), I was able to locate the two bilge pump hoses (3/4"id and 1" id) so that they drop right down from the back of the engine room through the opening where the water from the stuffing box flows into the bilge. This makes a shorter run for these hoses to the pumps
If any 40 owners wish to know more details send me a e-mail
Date: May 28, 1998
From: Don Garrett
(Our E42) . . . is a more than adequate Live Aboard Cruiser. We have had her in salt water for most of her life and like most of the other 42s she developed the classical fuel tank syndrome, We replaced the tank with a built in fiberglass tank at the Oxford Boat Yard, Oxford, Maryland. I highly recommend them to those of you who have not had the problem yet.
Date: June 3, 1998
From: John Bartoszek
I bought my Endeavour 40 (1981 model) 4 years ago and the fuel tank had already been replaced. What the previous owner did was replace (or just replumb) the smaller water tank for use as a fuel tank. The original fuel tank is still in the boat underneath the engine. In reading the entries under this heading, I gathered the space in front of the engine is where the generator should be. Is that what most Endeavours have ?? My boat did not come with a generator. That space is where the house batteries are. They sit on a fiberglass platform tha has a raised lip all around. I also have an engine battery which is located under the companionway. There is a space for a windlass battery under the V-berth but the boat did not come with a windlass either (although it looks like there was one just behind the anchor locker). I plan to reconfigure the anchor locker and mount the windlass on the forward part of the anchor locker lid (which I intend to cut and permantly fix to the top pf the anchor locker).
Date: June 23, 1998
From: JAXAshby
I found this posting in the rec.boats.cruising newsgroup:
>good posting with a problem many of us have.
>fiberglass tanks are real and in use everywhere
>get a big plastic rubbish bag that willfill the area and fill it up with
>water once you place it in the space available.
>knowing the capacity, then line the area with several layers of glass and
>plastic of your choice. Make a top with clean out door and fittings then
>seal it to the existing tank.
Stainless steel is sometimes used as fuel tank, but is not considered good choice. (Expensive, and I seem to remember the welds will eventually leak.) Flexible tanks are easy to install, but need excellent support on all sides to keep from abrading through. Understand the best tanks (i.e. longest lived, most trouble-free) are made epoxy (not polyester) covered plywood. (Add carbon black to the epoxy if you want to wow 'em with your "high-tech" tank.) Sounds like you could just epoxy in your tank space and then cover. Fair winds and enjoy your cruising.
Date: June 28, 1998
From: Rob Jones
Hi Paul I own August Moon a 1984 E40. My wife and I lived aboard for 7 years until 1995 when after hurricane Marylin we closed our charter buisness and I took a job as the director of Annapolis sailing school in St Croix VI , along with this came a house so the boat is at the dock. This has been a great liveaboard and crusing boat for us. I also had an E33 for a short time in 1990 and 1991. My solution for the fuel tank problem was to remove the formica and wood side of the storage locker aft of the nav station, use this as a pattern, fabricate a new tank for that area install a shut off at the feed for a gravity feed to the racor and it's back to put put. The tank holds aprox 57 gal . The next easy fix is a second tank under the aft bunk if needed. this will work for E40's that are configured without the storage locker aft of the nav station. More next time.
ps: since the deck fill and vent come down at the nav station the junction's can be made outboard behind nav area ,with a cover box finishing up.
Date: September 16, 1998
From: Armand Zerilli
I've had many E-40 owners contacting me after I posted my discussion memo of 5/27/98 detailing how I went about repairing my "leaking fuel tank". However I want to advise all owners that I do not think that's the best way of doing it. Don Garrett, who posted a note on 5/28 saying "he built his tank out of fiberglass" is by far the better material & method.
I have attached a file explaining the reason . I thought other members considering replacement might want to read.
James
There is not much more I can say regarding repairing the E-40 fuel tank other than saying....that if I had the time and inclination to doing it right I'd choose to build a tank out of glass that would encompass the bottom of the keel. This could be done by building a glass compartment where the old tank sits. This would be far superior to an aluminum tank plus it would give you a far greater margin of safety in case you were to put a hole in the keel (this is one of the real dangers of having tanks there.....you cant make repairs from the inside and boats have been known to sink because of this fact.
regards.......... Armand
James
The keel on the Endeavour 40 is hollow from the aft end up to the bulkhead where the forward water tank sits. Under the forward tank is where the ballast ( iron & lead) is glassed in. Therefore only the forward portion of your keel is solid....the mid and aft section contains your water tank and your fuel tank. If one was to hole that portion of the keel you would not be able to stop water from flooding the boat from the inside. I know of one incident in which an E-40 has sunk in the V.I. after hitting a submerged container. However, many boats having this type of keel configuration (i.e.. tanks in the keel) get into trouble when getting stranded on a reef. In such circumstances it would be better to have a full solid keel. However as a compromise for tankage space it probably be better to have your water tank and fuel tank as an intricate part of the lower keel ....this way if you were to hole the bottom of the keel the worse case is that you would loose fuel or water.
Some owners have put in fiberglass fuel tank. This is done by removing the existing aluminum tank by either removing both engines (main & gen.. set) or just the generator as I explained in my forum discussion memo. After doing so you are left with a cavity (see the measurements in my memo) . I would then use 3m vinylester and coat the bottom and the sides of the keel cavity and build a bulkhead in front out of plywood glassed over with vinylester. There already exist a partial bulkhead and I would just extend it to the bottom. I would them make a cover out of plywood, glass and vinlyester epoxy with all the necessary fuel hardware and gages. The high of the tank would be considerably shorter than the aluminum tank it replaces if you wanted to maintain the same storage or else you can make it the same and get about 30 more gallons of fuel.
I hope this answers your questions........Regards Armand
Date: October 1, 1998
From: Wayne Turk
After fighting the problem for about a year and trying several fixes which didn't solve the problem I finally bit the bullet and removed the old tank from my endeavor 40 and reinstalled a new one. After all was said and done I wish I had done it much earlier because it wasn't nearly as bad as I feared.
Your posting of the other people's solutions was very helpful to me in addressing my problem. Particularly helpful was the detailed information given by Armand as to how he went about the job. From that I knew it was possible to accomplish it without removing both the generator and the main engine. I did not write down the actual measurements as he did but when we checked ours against the his they were very close.
The first thing I did was to remove the generator myself while the boat was in its slip and before going to the yard. This was done very easily by attaching a hoist to a 4 x 4 laid across the companionway & raising it up. After raising it up I worked it forward and placed it on a wood frame I made with four casters on the bottom so that I could roll it forward while the other work was going on. It fits in between the the table and the settee on the port side with room to spare. The most of the work came from all the disconnectingwith of hoses, water lines, electrical, etc. before removing it. It was easy and the to do that this entire process was able to be done by myself.
After removing the generator I then took up the cabin sole between the table and the bilge so the shipwright could get to everything and the thereby saving as much of his high-priced labor as possible. At this point I took it to the boat yard and put it in a slip where there was power so he could work in the air conditioning and therefore encourage working in a boat bilge in July. He took out the old tank by pretty much destroying it with a saws all and bringing it out in 3 or 4 pieces. After which we re- assembled it and noted where the water was coming in. Actually most of the sides and the bottom of the tank were sound. The leak was coming from approximately a half-inch down the side from the top in two different places. Water was evidently getting in from the bilge alongside the tank soaking into the foam which held the tank in place until it pushed upward then underneath the sealed top of the tank and through the holes in the side near the top. We then built a mock up tank from plywood to be assured we could get the finished product back in. As in Armand's case we had to crop all the couple of corners which cost us very little fuel capacity. This gentleman Builds Steel boats and puts Steel fuel tanks in them, so therefore he recommended the same for strength in the keel. My keel was dry except for the side with a leak so with four coats of epoxy being put on after he pressure tested it I feel what we're doing will last. He built the tank with a lifting lug on the top so it could be put into the boat with a hoist brought alongside the dock. After placing it in the keel he used the same expandable foam to hold it there. Then he glassed it and the bilge in, then epoxied to insure a seal.
The rest is history. I've reinstalled the generator and all is working well. It's a reassuring feeling to know I have a sound tank in place and don't have to worry about this inherent problem to endeavors raising its head when I'm in the Bahamas or somewhere wanting to play.
I have about 10 pictures of the process if anyone is interested. Unfortunately they're all tiff image so they take about two minutes each to download. If you're interested, email me at the Janwayne@aol.com and I will forward to you. Thanks
Date: October 14, 1998
From: Ric Seymour
I have an Endeavour 37 B Layout (1981). I just replaced my fuel tank because of leaks. All I had to do was remove my cold plate compressor, remove some wiring, pump the tank out and lift. I got a new fuel fuel tank from the original manufacturer who is still in business in Florida. Cost $375 plus shipping.
Date: November 27, 1998
From: rpatar@mail.clis.com
We removed our leaking aluminum tank with a saws all, an unpleasant job. After building no end on wood lath alternative tanks, we settled on a flexible fuel cell. The tank is rectangular and had enough compressibility to get it into the bilge from forward, after removing the T-shaped water tank. We did not have to cut any floor stringers to accomplish this.
The new flexible tank is 52 gal and needed significant support to securely get it into permanent postition. We installed a platform in the bilge 7-1/2 inches high, made of epoxied plywood. This gave a lot of bilge space should water ever ingtrude. Bulkheads were epoxied in fore and aft of the tank and the sides were supported by urethane, spray in foam. The result is a secure and corrosion free tank, albiet quite a few gallons smaller than the original aluminum tank, around which the boat was surely built.
In retrospect, and after reading member solutions to nthe same problem, we would have picked some other solution. The flexible fuel cell cost $1300. Perhaps two smaller aluminum tanks in the bilge would have been significantly less costly. However, our tanks works just fine and will never corrode.
Date: April 29, 1999
From: Sam Woolsey
Paul,
Thanks for passing on my plea for help on my rudder problem. Perhaps the following could be of help to someone.
I learned about my fuel tank problems when the Engine quit at the intersection of the Houston Ship Channel, Texas City Ship Channel, and the Gulf Intracoastal Waterway.
After the 20+ miles return to our slip, I poured a bottle of blue food coloring into the bilge to find out if the water was entering the tank from below the bilge waterline. If the water that kept getting in the fuel was blue then, I reasoned, the water was entering the tank from below. No blue in the contaminating water meant that the water was entering the tank from somewhere else.
I sucked the water from the bottom of the tank and it was just filthy. The water was coming from above.
Careful cleaning of the top of the tank (the apparent bottom of the bilge) and some probing with an ice pick at some of the pitted places on the top of the tank located primarily around where the fuel line fittings are welded into the tank and around the hole for the fuel quantity gauge, revealed a number of holes 1/8" - 1/4" in diameter.
To repair the holes, I ground them out to bare aluminum with a Dremel tool, cleaned the area thoroughly, and filled them with an epoxy filler. To eliminate another possible entry point, I also replaced the neoprene rubber seal on the inspection hole. Because of the amount of pitting around the fuel quantity gauge, I removed it and expoxied over the hole.
To test the quality of my repair, I plugged all of the fitting holes save one, which I fitted with a barb as a connection for my 12 V tire pump. I covered the tank (filled the bilge) with soapy water and started the pump, the air bubbles showing me where the leaks were that I missed. I fixed the leaks I found and retested.
When I turned the bilge pump back on to remove the water, I discovered that the top of the tank was not left completely dry. The large 1500GPM pump was not located sufficiently low in the bilge to keep the top of the tank dry. To solve the problem, I placed a small Rule Platinum pump into a small depression that appears to be the low point in the bilge. It is located on the port side below the battery compartment beneath the ladder in the main salon. I plumbed the pump into the existing hose installing 2 one way valves to prevent backflow.
The next problem is to discover the source of the getting into the tank. My first guess was that it was coming from shaft stuffing box. In reality, it was coming from the stuffing box on the rudder shaft. Although the point the shaft enters the hull is out of the water dockside, under way, the rudder was forcing water up the shaft, around the stuffing, and into the boat. New stuffing in the box fixed this.
My repairs were thoroughly tested on a just completed 353 NM trip from Seabrook, TX to New Orleans, LA. The fuel stayed waterless, and the bilge stayed dry and Mary Ann and I were happy Sailors. Hope this helps someone.
Date: May 6, 1999
From: Joe Kovacich
The tank gauges on the Endeavour 43 are mechanical dial float gauges mounted in the top of the tanks under the floor grate and dust bin. They were made by the Rochester gauge company of Texas, Dallas, TX.
Date: June 12, 1999
From: Wayne Turk
I too was bothered by the salt water. I simply took a piece of 3/4" hose (clear) -- laid it on top of the fuel tank & cut long enough to reach from the bilge almost to the stuffing box (where the hull narrows). I then made a dam with 5200 about 3" tall with the hose laying on the bottom. Stuffing box water now goes through the hose & the tank remains dry. Elementary, but it works.
Date: June 18, 1999
From: Wayne Turk
Yes, that's where I got it. After talking about fixing his tank problem his parting words were "now how do we keep salt water from the stuffing box from running across the top of the tank to get to the bilge."
Date: June 26, 1999
From: Van
A problem with the E'40 is that salt water from the prop shaft and rudder shaft packing glands runs over top of the fuel tank to the bilge. Not a great arrangement! I have adopted Jeff's fix (his boat's name is Tiffany) for this as follows: Clean area under aft end of transmission thoroughly and put in a dam of a couple of layers of fiberglass about 4" high. This forms a small bilge under the prop shaft packing with room for a small 500 gph Rule pump and float switch. A l/2" brass swing check valve is installed at the pump output and the output hose teed into the main bilge pump exhaust about 3' above this area. This swing check keeps the main bilge pump from pumping back through the Rule ump and prevents drain back from the exhaust hose which could cause too much pump cycling. Cost is about $50.00 and 2 or 3 hrs. labor but the top of the fuel tank stays dry now.
Date: July 5, 1999
From: Wolfgang Harms
The aluminum fuel tank is designed to sit in the bilge, at the lowest point, where I always have 1 inch up to 3 inches of salt water. This weekend I found a leak and several cavities in the aft wall of the fuel tank as far as it is often immersed in bilge water. Surprising that it took 17 years. If you have this conditions you might inspect your tank before disaster strikes.
Question:
Did anybody take the tank out? How can you raise the floor board?
My plan is to have the bottom of the tank cut off, raise the bottom by 6 inches, so it will not be immersed. Also I want to build a 12 inches high figerglass wall aft of the tank so that leaking fuel will not get in the bilge and accidentally be pumped out. Any comments or suggestions?
PS: We just returned from a 2000 mile trip and exerienced every kind of problem. Contrary to last year, we were motoring mostly. But several problems were caused by island mechanics. I will be glad to make a list, if it can help anybody.
Date: July 9, 1999
From: Stuart Philips
Wolfgang,
In the tank of the Endeavor 43 is a well-known weak spot. The floor boards are easy to remove. The tank can be cut and welded after the floor boards are removed. Several people have had to repair them. The water tank is much more commonly a problem than the fuel tank. When you remove the floor you should inspect both of them. After they have been repaired or replaced it is a good idea to cover them with fiberglass or at least with a good epoxy finish to protect the salt water. Also make sure they are well grounded.
I have repaired my water tank after 17 years and removed three inches from the bottom of the tank. They have been okay for the last three years but I worry about them all the time.
Date: July 11, 1999
From: Joe Kovacich
I've rebuilt the bottom of my water tank and inspected the forward end of the fuel tank...
Basically, to remove the fuel tank, you will need to remove the floor section at the base of the companionway stairs. I'd suggest pulling the table and the stairs out first then locate the four plugs at the corners of the 3'x4' floor section (the one with the floor grid/dust pan in it) and drill a 1/8" hole down the middle of each. Insert a 2" long screw and drive it in - as it contacts the head of the screw below, the plug will simply rise up allowing neat removal. The four screws on the corners are the only ones holding the floor board down -- it will be stuck quite well from varnish/moisture/dirt etc. and you will need to use flat pry bars starting at the rear (after taking up the generator cover/floor board). I would recommend pulling the water tank area floor boards as well -- chances are it too is leaking. (we were suprised how much longer a tank full of water lasted after the leaks were gone)
The tank itself is held in place by 2"x2" boards screwed to the stringers (with 1/2" plywood spacers sandwiched along side the upper part of the tank) remove the lag screws from ALL 2x2's (over the water tank too) and pull the 2x2's along with the spancer plywood vertically out. (the one on the starboard side extends across both tanks, the port side is seperated because of the filler neck on the water tank - a real treat to get apart by the way)
If you haven't emptied the tank(s) yet, now is a good time to do so. Water is easy, fuel may require professional help to remove, store, and/or dispose...
Once the hold down boards are out of the way, remove all hoses, tubelines, etc. Locate the filler neck and remove the large hose (discard the clamps - you'll need to replace them with new) This is the hard part, working through the adjacent floor board openings, I was able to use a skinny pipe wrench to unscrew the filler nipple pipe to free it from the stringer... it only turns a very small amount at a time and will require patients and determination!
To lift the tank(s) out, I placed a short board inside the inspection plate opening and used block and tackle (man overboard recovery or boom vang blocks will work) hooked around that board to lift it. A nylon tow strap (automotive store item) passed out through one hatch and back down the other provided a good forward support for the block and tackle, while an extra line taken out the companionway to a primary winch provided the aft support (a halyard would work alright as well, but remember, I just pulled the water tank - there is no direct vertical way to lift it without rigging the lines just described....)
Neither tank will fit out the companionway. I cut the bottom away (about 6" up) with a scroll saw - there is a bulkhead running the full length down the middle so it has to be cut apart in two sections. Use these to have a new bottom fabricated. Cut away another few inches of the bulkhead to allow a good fit of the new sides - there is no way to refasten it inside the tank anyway, and you don't want it touching as that will invite a site for corrosion to start again. My new tank bottom is about an inch higher than the original... the tank sits on the hull above the keel section anyway - not on the bottom as we both thought originally.
Have the new bottom fabricated in a shop where they can do a good leakproof weld job (heliarc is the only way to go with aluminum).
Find a good portable welder who can come to the boat and heliarc aluminum - that part isn't messy, just hot.
By the way, I moved my bilge pump switch for the starboard pump down into the aft sump below the engine - that eliminates the problem of having sea water around the bottom of the tanks. they sit high and dry now.
Don't dam the area behind the fuel tank as that will trap water coming in down the mast and through the chain locker!!!
When the water tank is out, it's also a great time to get in under the floor boards and treat the mast step for rust! You will likely also find some rotted wood forward of the water tank - it was the dam used to hold the ballast material around the mast step during construction... remove the really rotten stuff and treat the rest with "git-rot" (or remove the plywood completely - it isn't doing anything anyway. Re-install in reverse order. GOOD LUCK! It can be done!
Date: January 18, 2000
From: Paul Medlock
I have just replaced the fuel and water tanks on my E-42 due to bilge water leaking into the fuel tank. We removed the athwartship stinger under the ladder and removed the generator (onto the main cabin hull as the water tank had been removed). We cut the top out of the two tanks under the engine and generator. We then fabricated cardboard mockups of each and fabricated new tanks from fiber glass. They were dry fit into the original areas and then foamed in. The water tank under the main floor was too large to remove from the boat and showed some corrosion so we cut it in half and removed it. I had two 316L stainless tanks fabricated to take the place of the one tank. The majority of the work was done by Mockingbird Marine in Houston. It was an expensive refit but necessary as water and diesel don't seem to get along too well. Anyone who is interested in the before hand research and the actual mechanics of the refit are welcome to email me at Consort@aol.com
Date: March 11, 2000
From: Paul Komarow
How and where can I put a gas gauge on my 1977 Endeavour 32?
Date: March 15, 2000
From: Carl Hibbard
Hello Paul,
Do you presently have a mechanical gauge installed, and want to replace it with an electric one or ?? Assuming that you have none. There may be a plate with about 5 screws holding it on about 3" in diameter on the top of the tank, this was where the mechanical gauge was mounted. If not you are going to have to remove the tank and cut a hole for mounting whatever device you install either mech. or elect..
I do have a/the source for orig equip mechanical ones if you decide to go that route.
Date: April 12, 2000
From: Keith Childs
I have an E-42 that needs to have the fuel tank replaced. I found a company called Skyline Industries that makes plastic fuel tanks. They said a mold would cost about $3000 and about $500 per tank. If anyone would be interested in splitting the cost of the mold please let me know or if anyone knows why I should not use plastic please let me know.
Date: April 13, 2000
From: Paul Uhl
Endeavour Owners,
Practical Sailor just responded to a letter with a similar question . . . "can you use the fiberglass hull be used as a fuel tank." The owner had a lazerette that was deep and not being used and asked if 'diesel' would have any adverse effects. PS responded indicating that diesel would not be harmful to the fiberglass and they didn't see any reason not to do this. However, as I remember, they recommended adding baffles to the 100gal tank. I also seem to remember them suggesting coating the glass with an epoxy barrier. I'd also locate it close to the center line of the boat.
Date: April 28, 2000
From: Donna Cass
Well, we on Bacchus spent the summer in sea trials on our E42. It is a great boat, and the only real problem was the leaky fuel tank. Donna became the fastest Racor operator in the East. We made the mistake of having a yard look at it. They were useless. After they claimed to have cleaned and tested the tank, the water still appeared in the bowl after 15-30 minutes of running. We took matters into our own hands, which is the ONLY way we are going in the future. After punping out the tank into 15 gal temp tanks with a rented manual pump (took all of 15 minutes, the yard took over an hour) we popped the inspection port and found, mud and gunk as well as tools and level gauge parts in the tank. After cleaning the tank using a shop vac and some rags, we inspected the tenk and found it to be sound exzcept for the top of the tank. This was pitted badly. We don't know how this tank passes the pressure test that the yard performed. The fix we chose was to etch the tank with a mild acid, wire brush the tank until reasonably clean, (tough in the aft portion under the engine) and coat the top with 5 coats of a product used inside tanks to seal them when the tanks can be rotated to spread the material. The interior of the tanks appear solid, and there was no intrusion between the glass/resin side covers and the tank. We are next going to create a dam at each of the for and aft walls of the fuel tank to direct any water directly into the sump. This, with a dripless packing and new shaft (the part where the flax was packed had developed a serious concavity from abrasion over the years) we hope to cruise without the twice or three times daily drill with the racor. Additionally, we will be putting a second Racor 500fg in parrallel with the present filter so that we can switch quickly in rough weather, and not have to stop the engine.
We want to thank all of the forum members who contributed to all of the forum topics, as they have been of great assistance to us, in refitting our dreamboat.
Date: May 20, 2000
From: William Lowenberg
I also have an E42 (Last Dance)1985. I also worry about the fuel tank leaking. Dan (?)Haus had his replaced by cutting in through the hull and building a fibreglass tank in place. Cost about $10K including hull rebuilding and imron paint. If the tank is built in an external mold, can it be installed into the boat? Need to remove engine? Cabnetry?
Date: July 23, 2000
From: William Lowenberg
Keith,
Probably a good idea, but look into the permiability of the existing fibreglass. This may allow a perpetual Diesel odor. Why didn't Endeavour do it this way originally? Will you require baffles? Why remove old tank with this repair? Is there any info available from the forum to see how they solved the problem? Ain't boating fun ($$$$).
Date: September 5, 2000
From: Charlie Miller
Have read the forum topic "leaking fuel tanks" All referred to E40-42. ANy systemic problems with leaking tanks on the E32?
Date: September 6, 2000
From: Paul Uhl
Charlie,
I've been running this forum for 4 years now and I haven't heard any E32 owners indicate a problem. However, the tanks in the E32 are aluminum and I would suppose that they could 'pit' or 'corrode' through just as the aluminum tanks in any other boat would. The problem is letting them sit in water, especially salt water. Keep 'em dry and grounded.
Date: September 26, 2000
From: Don Pothier
Paul,
I'm been an Endeavour 43 owner since 1990, moved aboard in 1993, and my wife and I spent 6 years cruising between Puerto Rico to Trinidad and Venezuela. We are now settling down in Florida's Treasure coast.
I was wondering if anyone out there has had experience in changing out the fuel tank or the water tank on an Endeavour 43. Thanks for any information you can come up with.
Date: September 27, 2000
From: Don Freeman
We replaced our tanks before starting out from San Diego. We've seen several variations at replacement tanks, but felt we wanted tanks that basically fit the same way. However, it is not possible to replace them like for like because they will not fit. What we did was remove the tanks by raising each into the cabin and with a sawzall, cutting them into 4 components. We found the largest tanks for replacement would be possible by making a pair of saddle tanks for fuel and water. We built a bed out of epoxy impregnated two by fours with epoxy impregnated ply on top. This reduced the tank height by 4.25 inches. We then had the tank "man" use the old cut tanks which we reassembled as his model. We adjusted the length so that the water became only 124 gal and the fuel became 184 gal. We used stainless for the water and a high marine grade aluminum for the diesel. Large clean outs on top of each of the four tanks and they bolt together at the top. We placed a 1/4 inch sheet of ply between them to eliminate any chance of chafe. Then we blocked them into place. We plumbed each separate using its own y-valve arrangement. The fuel tanks have spare plugs for possible use for a generator and we use them for dip sticks to accurately measure. In the last 9000 miles of ocean use there has been no movement, no leakage, no problems. Good luck.
Date: October 7, 2000
From: Paul Uhl
Endeavour Owners,
One of the more common or popular topics is that of replacing fuel, water, and holding tanks. In the October 2000 issue of SAIL Magazine there is a very good article about the causes of their deterioration, preventitive measures, the best materials for their uses, how they're manufactured, etc. There is also a list of about 12 manufacturers and the types of tanks they specialize in making. I highly recommend reading it if you're considering a replacement.
Date: November 6, 2000
From: Charlie Mackey
My 79 E-32 has a deep well in the rear 1/3 of the keel, aft of the ballast. This "hole", almost 3 ft. deep, was a magnet for falling items, and retrieval of them was an unpleasant experience. In addition, I felt that if the hull were ever holed in this vulnerable spot I would be unable to make temporary repairs from inside due to the inaccessibility of the area. I consequently built and fiberglassed in a sturdy and waterproof false floor so that the sump is now only some 10 in. deep. The result of all of this is that I now have a compartment below which will hold somewhere between 18 and 20 gallons. The question is; can I use this for diesel fuel storage? does anyone know what diesel does to fiberglass, and vice versa. Thanks.
Date: November 30, 2001
From: Fred Verplanck
The weakest link on the E40 is the aluminum tanks...both fuel and water. The fuel tank and aft water tank sit in the keel cavity. Our '85 E40 needed a complete tank transplant. Most do !! The fuel tank had become contaminated with water, and upon inspection was found to have several holes.. The aft water tank was as porous as swiss cheeze. Electrolisis. They had to come out. NOT a pretty task. Some have chosen to take the fuel tank out through the main cabin. The Forum should have pix of this. We chose to take our fuel tank out through the port side of the keel....and you can imagine what that entails. A 3 ft by 6 ft "hole" in the side of the keel is not a sight for the feint at heart.
The water tanks came up and out through the cabin and I had to take a saw to 'em, cutting the forward tank down the middle, to get the pieces out the hatch. I chose to expand fuel capacity by having the new fuel tank go all the way forward to the step in the bilge. It gave us another 30 or sogallons of diesel. Losing the same amount of water capacity didn't bother us much...we have an RO water maker. A new hand laid up fiberglass 100 gal fuel tank, and three poly-something water tanks later, and we have no more bilge water in our fuel &/or drinking water. I said three water tanks, because the forward water tank (original size) wouldn't fit through the hatch...ergo, two (side-be-side) tanks in the same place. Talk about tearing up the boat ? And we were living aboard, in the yard at the time. It took about three months. My dear long-suffering spouse has the status of "goddess" among our cruising friends....... justifiably so ! ;<) If your boat still has the original aluminum tanks, prepare for a big $$$Shock.
Date: November 30, 2001
From: Paul Uhl
One of the biggest complaints I hear from owners are that their aluminum fuel tanks eventually have to be replaced because they start to leak. Everything that I've read about this indicates that "water" in the bilge (especially salt water) is the the single biggest factor contributing to their demise--so keeping them dry is very important!
Having said that, I recently read of an owner (not an Endeavour) that came up with a great way to help prevent this. Since many tanks like his sit in the bottom of the bilge where water collects, his idea was to raise the tank off the bottom so that it wouldn't continuously sit in bilge water or trap condensation. He took nonpervious plastic such as polyethylene (the stuff plastic cutting boards are made of--you can buy stock at WEST Marine), cut it into strips, and using a sealant glued it to the bottom of the tank. The strips were aligned fore and aft so that as the boat pitched, it wouldn't hinder water flow. It was also noted that the sealant must make a complete seal so that water isn't trapped between it and the tank.
Date: December 10, 2001
From: Fred Verplanck
Paul,
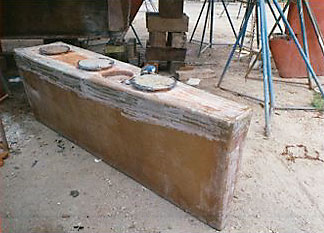
A preview of coming attractions......This shows the new fiberglass tank...it has a "well" in which my bilge pump sits.
![]()
![]()
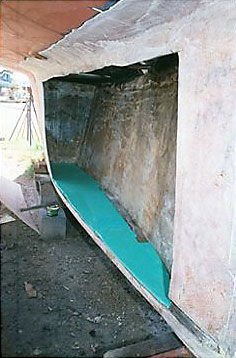
....and the hole it fits in. This is what the E40 keel cavity looks like....when the fuel tank and aft water tank have been removed. Awesome, huh? Our boat had this aspect for about a month. It generated a LOT of local interest. The blue color is closed-cell foam, installed as padding for the new tank.
![]()
Date: January 20, 2006
From: Paul Uhl
Here is a great article I found on the subject: How to Install an Aluminum Fuel Tank PDF (34k)
Date: January 20, 2006
From: Michael Gendel
Hi Paul
I would add one other comment as explained to me by a tank fabricator. Regarding galvanic corrosion, he welds on a ground tab. He urged that the tab be connected to the boats DC ground system just as the through hulls are. I also had corroborating advice. Thus, the tank would presumably be at the same potential, and galvanic current would not flow or flow to the sacrificial anode.
As previously described, the new 1/8" gauge, epoxy painted, AL tanks in hull 145 where placed on 3" FG ledges laid on the bottom of the keel, thus raising the tank out of any water accumulation. The foam was removed and not replaced. The addition of a couple of glass layers strengthen the sides of the keel, since the old foam was not replaced. The tanks were tabbed in with glass and suitable bracing. In this manner the tanks are fully exposed to air flow in the deep bilge. A PVC bilge standpipe mated to a GROCO strainer rises out of the bilge between the two tanks and is accessible by pulling up the narrow floor panel under the companion way ladder.
The aft 2/3 of the bilge contain a fuel tank of approx 74 gal. A 37 gal fresh water tank rests just behind the lead keel and forward of the fuel tank.
Anyone in the Baltimore area who may like to see SeaVousPlay is well to contact me.
Date: January 23, 2006
From: Charles Miller
Paul
The attachment from Dave Pascoe is a good idea. Mr Pascoe is respected surveyor:
I would like to add that many leaks in fuel tanks do not originate from a tank sitting in water but from water entering the tank and sitting in the lower extremities and corroding the weld joints from the inside. In this case raising the tank will not help.
A much better and preferable solution in the event of leaks is to replace the tank with a plastic one which conforms to ABYC standards.
Date: May 15, 2007
From: Paul Uhl
In the May 2007 issue of Practical Sailor there is an in depth article exploring the ideal fuel tank replacement. It looks at the pros and cons of various materials, construction methods, and ways of minimizing corrosion in the first place.
![]()